The Antialiasing is designed to smooth the surfaces of your 3D print by adding extra greyscale pixels on the curvature of the images that the 3D printer will display on the screen. Lychee Slicer provides different Antialiasing algorithms, producing different results based on your needs.
Please note that antialiasing adds extra calculations for the slicing process, which increases the speed of slicing. In general, printers above 8K result in perfect prints without the need for antialiasing. Reducing the layer height to a maximum of 30 um will give you comparable smoothness. Feel free to make a test print to check it yourself!
Most of the time, we recommend using Smooth Surface anti-aliasing. It’s also important to note that not all resins react the same way to anti-aliasing. Some entry-level resins may not respond as well as high-quality ones. This also means that it’s important to consider that one setting may not give the same result from one resin to another, as well as from one exposure time to another.
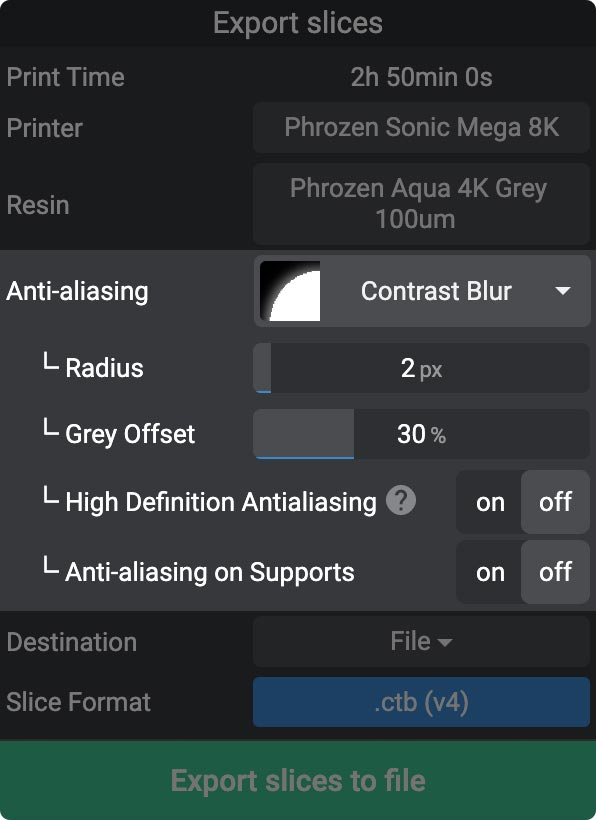
The anti-aliasing settings in the Export panel
Don’t hesitate to do some testing to find the parameters that work best for you.
The different types of anti-aliasing
Off
It is the default setting. No anti-aliasing effect is applied to the edges of the images to be printed. This choice remains relevant for models composed of many small and fine micro details. In particular, for 3D printers that offer a very high horizontal resolution, under 35 microns as the pixel size makes the use of anti-aliasing less needed.
Smooth Surface
This is the recommended mode for maximum anti-aliasing effect. The algorithm applies an anti-aliasing effect on the edges of the image of each layer and then applies a slight blur of a few pixels on top of the result. This will further improve the quality of the surface and will slightly limit the effect of stacked layers that can be seen on top of the curves.
The Grey Offset allows for better control of the beginning of the resin solidification process.
Sharpen Details
This antialiasing mode is the historical one of Lychee Slicer, which offers very sharp details, but still leaves some aliasing potentially still visible, depending on the resin used.
The use of the Level value will be important, often used at its maximum, to manage the spread of the greyscale level. The Grey offset will allow better control of the starting point of the resin solidification.
Contrast Blur
This mode is similar to the Smooth Surface mode, with the same options. However, there is a strong contrast at the surface border, and the blur is applied around it. It is a mix between Smooth Surface anti-aliasing and Sharpen Details.
Settings
The anti-aliasing offers several settings and parameters, available depending on the modes you choose. Be careful, some of them can greatly affect the result obtained and/or the calculation performance of the final slices.
Radius
The Radius (Blur) value allows you to change the intensity and especially the spread of the blur applied to the edges of the image. Increasing the value will result in much smoother surfaces, but there will be a loss of definition of micro details. It is important to match the value to the resolution of your printer. The smaller the pixels of your 3D printer, the higher the value. For example, 2 pixels for a 50 micron printer in horizontal resolution and 3 for a 35 micron printer.
Level
The Level allows you to define the spread of the anti-aliasing along the curves of the 2D image. The higher the value, the more the grey level stretches along the image, allowing a smoother transition. A lower value will concentrate the spreading on a smaller distance but will also limit the number of grey values.
High Definition Anti Aliasing
This mode, available in all antialiasing types, offers an optimal quality for antialiasing, but it can significantly increase the computation time when exporting, especially on machines with limited performance. This mode also consumes a lot of memory on the graphics card and can, in some cases, cause the 3D display of the application to be lost.
This option is strongly recommended to improve surface definition.
Grey offset
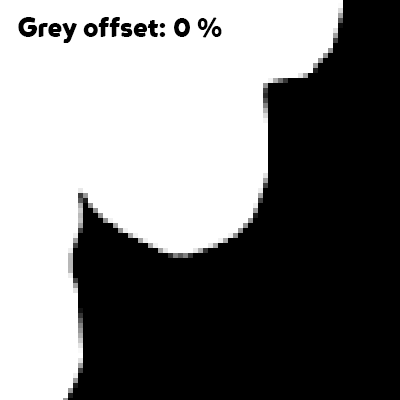
The Grey Offset parameter allows you to edit the contrast of the grey levels, and also the grey value that acts as the starting point for the anti-aliasing.
You can see the impact of the grey offset value on the quality of the anti-aliasing. 3D model by Bold miniatures, photo by DosGrajos.
It is important to consider that the resin needs a minimum exposure to UV light to begin to solidify. However, some resins need more time than others to start this light curing process and, therefore, require more “white” color in the pixels forming the anti-aliasing. Other resins, often more qualitative, are more reactive and start to harden with less light intensity. Adjusting this parameter can have a significant impact on the quality of anti-aliasing.
To the left, the same slice image, with different Grey offset values
Anti-aliasing on Support
By default, supports do not have anti-aliasing applied. This avoids having, especially on very thin tips, grey levels that could reduce the actual size of the tip and, therefore, weaken the supports. It is recommended to leave this parameter deactivated.